

 Return to Help Index
| Additional Support | |||||||||||||||||||||||||||||||
 |
|||||||||||||||||||||||||||||||
| Dental Handpiece Maintenance Tips | |||||||||||||||||||||||||||||||
Dental Handpiece Repair Guide How to Replace a Dental Handpiece Turbine: Step-by-Step Repair Guide Professional dental handpiece repair services charge $85-$250+ per handpiece, plus shipping time and downtime. Replacing the turbine yourself takes under 10 minutes and costs a fraction of a repair service — typically $25-$80 for a replacement turbine cartridge depending on the brand and model. This guide walks through the complete process of diagnosing handpiece problems, replacing turbines and bearings, and verifying the repair — covering NSK, KaVo, Midwest, Star, and other major brands. When Does a Dental Handpiece Need Repair? Not every handpiece problem requires internal repair. Before disassembling anything, rule out external causes: Check first:
Symptoms that indicate turbine/bearing failure:
If the symptom matches the left column and lubrication does not resolve it, the turbine or chuck mechanism needs replacement. Understanding Dental Handpiece Anatomy Before starting a repair, it helps to know what is inside the handpiece head. High-speed handpiece components:
[IMAGE: Exploded view of a dental handpiece turbine cartridge showing all components] What You Need Replacement parts (match to your specific handpiece model):
Tools:
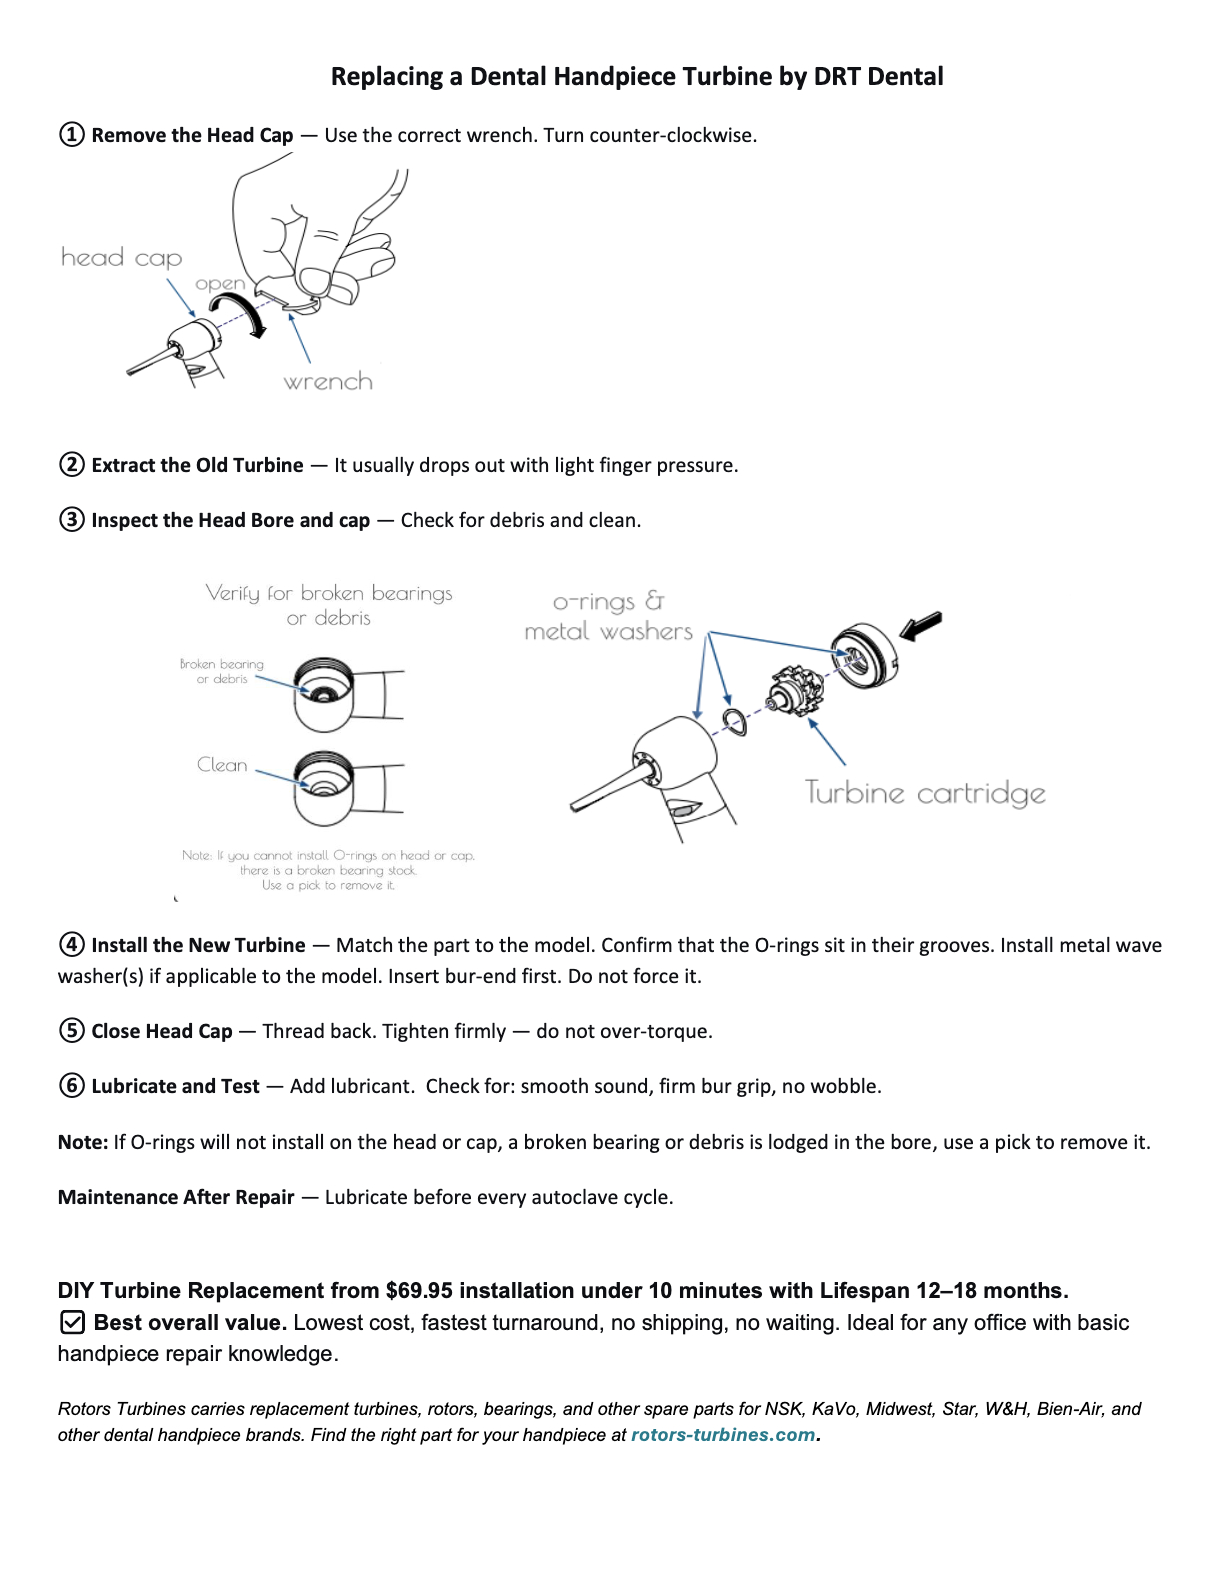
No specialized equipment is required for a standard turbine replacement. The turbine cartridge drops into the head as a single unit. Step-by-Step: Replacing a Dental Handpiece Turbine Step 1: Remove the Head Cap Using the correct wrench for your handpiece model, unscrew the head cap. Some models use a snap-fit cap — press inward on the retention clips while pulling the cap forward. KaVo handpieces: Typically use a back-cap wrench. Turn counter-clockwise. NSK handpieces: Many NSK models use a push-type or threaded cap. Check your model — Ti-Max and Pana-Air have different cap mechanisms. Midwest/Star handpieces: Usually wrench-type. Midwest Tradition uses a specific cap wrench size. Set the head cap aside. Inspect it for cracks, thread damage, or worn retention features. A damaged head cap should be replaced — it cannot hold the turbine securely and will cause air leaks. [IMAGE: Removing a head cap with the correct wrench — show KaVo and NSK examples] Step 2: Extract the Old Turbine With the head cap removed, the turbine cartridge is accessible. In most handpiece designs, the turbine drops out or slides out with light finger pressure from the opposite end. If the turbine is stuck:
Once removed, note the turbine's orientation — specifically which end faces the head cap and which faces the back. New turbines must be installed in the same orientation. Step 3: Inspect the Handpiece Head Bore Before installing the new turbine, look inside the head bore. You are checking for:
Clean the bore with a lint-free cloth. If available, use a brief burst of compressed air to clear any remaining particles. A clean bore ensures the new turbine seats properly and the O-rings seal correctly. Step 4: Install the New Turbine Prepare the new turbine:
Insert the turbine:
Do not force the turbine. If it does not slide in smoothly, remove it and check for O-ring misalignment, debris in the bore, or incorrect part match. [IMAGE: Installing a new turbine cartridge — correct orientation visible] Step 5: Replace the Head Cap Thread or snap the head cap back into place. Tighten wrench-type caps firmly but do not over-torque — excessive force can crack the cap or distort the threads. The head cap holds the turbine in position and provides the front bearing support. A loose head cap allows the turbine to shift during operation, causing vibration and premature bearing wear. Step 6: Lubricate and Test Before connecting to air:
Test checklist:
If any test fails, remove the head cap and check turbine seating, O-ring condition, and orientation. Replacing Bearings Only (When It Makes Sense) In most cases, replacing the complete turbine cartridge is the recommended approach. Pre-assembled turbines come factory-balanced with new bearings already pressed onto a new rotor. However, bearing-only replacement may be appropriate when:
Why bearing-only replacement carries risk: Pressing bearings off and onto a rotor spindle can deform the spindle by as little as 1-2 microns — enough to affect bearing preload and rotational balance at 400,000 RPM. This is why rebuilt turbines can have failure rates significantly higher than new replacement turbines. For dental offices without repair technician experience, a new replacement turbine cartridge is the safer and more reliable option. Brand-Specific Repair Notes NSK Handpiece Repair NSK high-speed handpieces (Ti-Max, Pana-Air, Pana-Max) use NSK-specific turbine cartridges. Key notes:
KaVo Handpiece Repair KaVo handpieces (MasterTorque, SmartTorque, EXPERTtorque, GENTLEforce) use high-precision turbine cartridges. Key notes:
Midwest and Star Handpiece Repair Midwest Tradition and Star handpieces are widely used in North American practices. Key notes:
Repair vs. Replacement: The Math
Replacing the turbine yourself eliminates shipping delays, avoids repair service markups, and installs a factory-new balanced turbine rather than a rebuilt one. For most dental practices, this is the most cost-effective option. Frequently Asked Questions How much does it cost to repair a dental handpiece? Mail-in repair services charge $85-$250+ depending on the brand and repair needed. Replacing the turbine yourself costs $25-$80 for the part. The labor takes under 10 minutes with no special tools beyond a head cap wrench. Can I repair my handpiece myself or do I need a technician? Turbine replacement is a straightforward process that any dental professional can perform. The turbine cartridge drops into the handpiece head as a single unit — no pressing, aligning, or calibration is required. Chuck mechanism replacement and fiber optic repairs are similarly accessible. How long does a repaired handpiece last? With a new replacement turbine and proper maintenance (lubrication before every autoclave cycle), expect 12-18 months of clinical service. Rebuilt turbines from repair services typically last 6-12 months due to spindle deformation during the rebuild process. What is the difference between a rotor and a turbine? The rotor is the central spinning component — the spindle with impeller blades attached. The turbine (or turbine cartridge) is the complete assembly: rotor + bearings + housing. When people say "replace the turbine," they typically mean the entire cartridge. Should I replace my handpiece or repair it? Repair (turbine replacement) is almost always the better financial choice. A $1,500 handpiece with a $50 turbine replacement restores full OEM performance for a fraction of the cost. Replace the handpiece body only if the head bore is damaged, the fiber optic system is cracked, or the handpiece body is physically bent or corroded. Where can I find the correct turbine for my handpiece model? Search by brand and model number. Each handpiece uses a specific turbine cartridge — NSK Ti-Max turbines do not fit KaVo handpieces, and vice versa. Aftermarket replacement turbines that match OEM specifications are available for most major brands at a fraction of OEM pricing. Rotors Turbines carries replacement turbines, rotors, bearings, push buttons, O-rings, fiber optic rods, and other spare parts for NSK, KaVo, Midwest, Star, W&H, Bien-Air, and other dental handpiece brands. Find the right part for your handpiece at rotors-turbines.com. |
|||||||||||||||||||||||||||||||
| Dental Handpiece Repair Guide | |||||||||||||||||||||||||||||||
This guide walks through the complete process of diagnosing handpiece problems, replacing turbines and bearings, and verifying the repair — covering NSK, KaVo, Midwest, Star, and other major brands. When Does a Dental Handpiece Need Repair? Not every handpiece problem requires internal repair. Before disassembling anything, rule out external causes: Check first:
Symptoms that indicate turbine/bearing failure:
If the symptom matches the left column and lubrication does not resolve it, the turbine or chuck mechanism needs replacement. Understanding Dental Handpiece Anatomy Before starting a repair, it helps to know what is inside the handpiece head. High-speed handpiece components:
What You Need Replacement parts (match to your specific handpiece model):
Tools:
No specialized equipment is required for a standard turbine replacement. The turbine cartridge drops into the head as a single unit. Step-by-Step: Replacing a Dental Handpiece Turbine Step 1: Remove the Head Cap Using the correct wrench for your handpiece model, unscrew the head cap. Some models use a snap-fit cap — press inward on the retention clips while pulling the cap forward. KaVo handpieces: Typically use a back-cap wrench. Turn counter-clockwise. NSK handpieces: Many NSK models use a push-type or threaded cap. Check your model — Ti-Max and Pana-Air have different cap mechanisms. Midwest/Star handpieces: Usually wrench-type. Midwest Tradition uses a specific cap wrench size. Set the head cap aside. Inspect it for cracks, thread damage, or worn retention features. A damaged head cap should be replaced — it cannot hold the turbine securely and will cause air leaks.
Step 2: Extract the Old Turbine With the head cap removed, the turbine cartridge is accessible. In most handpiece designs, the turbine drops out or slides out with light finger pressure from the opposite end. If the turbine is stuck:
Once removed, note the turbine's orientation — specifically which end faces the head cap and which faces the back. New turbines must be installed in the same orientation. Step 3: Inspect the Handpiece Head Bore Before installing the new turbine, look inside the head bore. You are checking for:
Clean the bore with a lint-free cloth. If available, use a brief burst of compressed air to clear any remaining particles. A clean bore ensures the new turbine seats properly and the O-rings seal correctly. Step 4: Install the New Turbine Prepare the new turbine:
Insert the turbine:
Do not force the turbine. If it does not slide in smoothly, remove it and check for O-ring misalignment, debris in the bore, or incorrect part match. [IMAGE: Installing a new turbine cartridge — correct orientation visible] Step 5: Replace the Head Cap Thread or snap the head cap back into place. Tighten wrench-type caps firmly but do not over-torque — excessive force can crack the cap or distort the threads. The head cap holds the turbine in position and provides the front bearing support. A loose head cap allows the turbine to shift during operation, causing vibration and premature bearing wear. Step 6: Lubricate and Test Before connecting to air:
Test checklist:
If any test fails, remove the head cap and check turbine seating, O-ring condition, and orientation. Replacing Bearings Only (When It Makes Sense) In most cases, replacing the complete turbine cartridge is the recommended approach. Pre-assembled turbines come factory-balanced with new bearings already pressed onto a new rotor. However, bearing-only replacement may be appropriate when:
Why bearing-only replacement carries risk: Pressing bearings off and onto a rotor spindle can deform the spindle by as little as 1-2 microns — enough to affect bearing preload and rotational balance at 400,000 RPM. This is why rebuilt turbines can have failure rates significantly higher than new replacement turbines. For dental offices without repair technician experience, a new replacement turbine cartridge is the safer and more reliable option. Brand-Specific Repair Notes NSK Handpiece Repair NSK high-speed handpieces (Ti-Max, Pana-Air, Pana-Max) use NSK-specific turbine cartridges. Key notes:
KaVo Handpiece Repair KaVo handpieces (MasterTorque, SmartTorque, EXPERTtorque, GENTLEforce) use high-precision turbine cartridges. Key notes:
Midwest and Star Handpiece Repair Midwest Tradition and Star handpieces are widely used in North American practices. Key notes:
Repair vs. Replacement: The Math
Replacing the turbine yourself eliminates shipping delays, avoids repair service markups, and installs a factory-new balanced turbine rather than a rebuilt one. For most dental practices, this is the most cost-effective option. Frequently Asked Questions How much does it cost to repair a dental handpiece? Mail-in repair services charge $85-$250+ depending on the brand and repair needed. Replacing the turbine yourself costs $25-$80 for the part. The labor takes under 10 minutes with no special tools beyond a head cap wrench. Can I repair my handpiece myself or do I need a technician? Turbine replacement is a straightforward process that any dental professional can perform. The turbine cartridge drops into the handpiece head as a single unit — no pressing, aligning, or calibration is required. Chuck mechanism replacement and fiber optic repairs are similarly accessible. How long does a repaired handpiece last? With a new replacement turbine and proper maintenance (lubrication before every autoclave cycle), expect 12-18 months of clinical service. Rebuilt turbines from repair services typically last 6-12 months due to spindle deformation during the rebuild process. What is the difference between a rotor and a turbine? The rotor is the central spinning component — the spindle with impeller blades attached. The turbine (or turbine cartridge) is the complete assembly: rotor + bearings + housing. When people say "replace the turbine," they typically mean the entire cartridge. Should I replace my handpiece or repair it? Repair (turbine replacement) is almost always the better financial choice. A $1,500 handpiece with a $50 turbine replacement restores full OEM performance for a fraction of the cost. Replace the handpiece body only if the head bore is damaged, the fiber optic system is cracked, or the handpiece body is physically bent or corroded. Where can I find the correct turbine for my handpiece model? Search by brand and model number. Each handpiece uses a specific turbine cartridge — NSK Ti-Max turbines do not fit KaVo handpieces, and vice versa. Aftermarket replacement turbines that match OEM specifications are available for most major brands at a fraction of OEM pricing.
Rotors Turbines carries replacement turbines, rotors, bearings, push buttons, O-rings, fiber optic rods, and other spare parts for NSK, KaVo, Midwest, Star, W&H, Bien-Air, and other dental handpiece brands. Find the right part for your handpiece at rotors-turbines.com. |
|||||||||||||||||||||||||||||||
| Replacing a Dental Handpiece Turbine by DRT Dental | |||||||||||||||||||||||||||||||
 |
|||||||||||||||||||||||||||||||
| How do I contact you? | |||||||||||||||||||||||||||||||
| Please click here for our company contact information. | |||||||||||||||||||||||||||||||